


Assessments - 5, GPA: 4.2
(

 )
)
|
Fotos e especificações Yamaha NS-150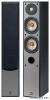 |


Facilidade de uso
For safety reasons, using commercially available products that increase stability in the speaker is recommended (metal fittings or chains, etc.). Use the stands included with the speakers to increase stability: . Stands Be sure to use the stands regardless of where the speakers are positioned. Attaching the stands included with the speakers reinforces the base of the speaker not to fall over. Please be cautioned that even though the stands are connected, this does not guarantee that the speakers will not fall over. HOW TO USE THE ACCESSORIES INCLUDED WITH THE SPEAKERS n Attaching the stand n Attaching the spike English Screw (6 mm) x 4 Wood screw (4 mm) x 4 Stand x 4 Pad x 4 When positioning the speakers, be sure to use the stand to increase stability. Use the 8 specified holes located on the base of the speaker. Procedure: . Put the 6 mm screw through the larger hole on the stand, and attach to the speaker at one of the outside holes on the base of the speaker. At this time, attach the stand to the speaker so that it can still be moved slightly. . Put the 4 mm wood screw through the smaller hole on the stand, and screw it into the inside hole on the base of the speaker. . When both screws have been attached, tighten both of the screws so that the stand is firmly in place. Be sure to check that the stand is firmly attached. . Attach the pads to the bottom of the end portion of the stand. . Attach the other stands in the same manner and confirm that all 4 stands have been firmly attached. . Place the speaker in the desired location. Note If force is applied to the side of the speaker, it may fall and damage the speaker or cause personal injury. Please be careful. Spike x 4 When setting up the speakers on a thick carpet, use the spikes instead of the stand. With 4 points set in place to achieve increased stability and improvements in sound quality. Procedure: . Set the nut close to the tip of the spike and screw them into the bottom of the speaker at each of the four specified holes. . Place the speaker in the desired location in an upright position and adjust the length of the spike to match the depth of the carpet. . When adjustment is complete, twist the nut up to the base of the speaker firmly. Notes . The tips of the spikes may scratch or otherwise damage the flooring. Please be careful when positioning the speakers. . If force is applied to the side of the speaker, it may fall and damage the speaker or cause personal injury. Please be careful. . Either end of the spike may be inserted into the holes on the speaker to accommodate different types of conditions and installations. CONNECTIONS TO YOUR AMPLIFIER This speaker system is capable of standard connections and bi-wiring connections. Before making connections, make sure that the amplifier is switched off.