


Assessments - 4, GPA: 4.3
(

 )
)
|
Fotos e especificações Yamaha NS-333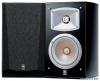 |


Facilidade de uso
Using as front or rear effect speakers Mount the speakers on a wall or place the speakers on a shelf. Determine the best position by following the owner’s manual supplied with your amplifier. Main (L) NS-333 Subwoofer Main (R) Center Note This speaker features a magnetically shielded design, but there is still a chance that placing it too close to a TV set might impair picture color. Should this happen, move the speaker away from the TV set. English 1 To mount the speaker on a wall by using the attached mounting bracket Fasten screws into a firm wall or wall support as shown in the figure, and hang the holes of the mounting bracket on the protruding screws. * Make sure that the screws are securely caught by the narrow parts of the holes. Tapping screw (3.5 – 4 mm) (Available at the hardware store) Wall/ Wall Support Min. 20 mm 3 mm WARNING • This speaker weighs 5.5 kg (12 lbs. 2 oz.). Do not mount it on thin plywood or a wall with soft surface material. If mounted, the screws may come out of the flimsy surface and the speaker may fall. This damages the speaker or causes personal injury. • Do not install the speaker to a wall with nails, adhesives, or any other unstable hardware. Long- term use and vibrations may cause it to fall. • To avoid accidents resulting from tripping over loose speaker cable, fix it to the wall. CONNECTIONS TO YOUR AMPLIFIER Before making connections, make sure that the amplifier is switched off. SPEAKERS A B LR ++ – – Loosen Tighten Black (–) Red (+) Speaker (R) Speaker (L) Amprifier or Receiver Speakers output terminals of the amplifier Connections • Connect the screw-type input terminals at the rear of the speaker to the speaker output terminals of the amplifier (or receiver) with the speaker cable. • Connect the (+) terminals on the amplifier (or receiver) and the speaker using one side of the cable. Connect the (–) terminals on both components using the other side of the cable. • Connect the speaker to the center terminals of the amplifier (or receiver) making sure not to reverse the polarity (+, –). If the speaker is connected with reversed polarity, the sound will be unnatural and lack bass. How to Connect: 1 Remove the insulation coating at the extremity of each speaker cable by twisting the coating off. Good No Good 2 Loosen the terminal knob. 3 Insert the bare wire. 4 Tighten the knob and secure the cable. Test the firmness of the connection by pulling lightly on the cable at the terminal. Note Do not let the bare speaker wires touch each other to avoid damaging the speaker or the amplifier, or both of them. [Using a Banana Plug] 123 Banana Plug 1 Remove the speaker terminal cover by gently pulling it toward you. 2 Tighten the terminal knob. 3 Simply insert the banana plug into the terminal. REMOVING THE FRONT COVER SPECIFICATIONS The front cover is fastened to the enclosure at four points and can be removed if desired. To remove the cover, hold on to both sides and slowly pull straight away from the speaker. To reattach, line up the four pegs on the inside surface of the cover with the four corresponding holes on the speaker and push gently. Note When the cover is removed, take care not to touch the speaker units with your hands or to exert excessive force with tools. Type ............................. 2-way bass reflex speaker system magnetic shielding type Driver...........................................13 cm (5") cone woofer 2.5 cm (1") dome tweeter Frequency response.................................. 60 Hz – 35 kHz Nominal impedance...............................................6 ohms Nominal input power...................................