


Assessments - 4, GPA: 4
(

 )
)
|
Fotos e especificações Sony PS-LX300USB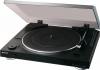 |


Facilidade de uso
If the tone arm descends and the stylus touches the vinyl record, a loud creaking noise may occur and harm the amplifier or speakers. Adjust the volume of the amplifier after the stylus descends. 7 Adjust the volume on your amplifier. When playback is finished The tone arm returns to the arm stand automatically, then the platter stops rotating. To stop playing Press the STOP button. The tone arm returns to the arm stand. The platter stops rotating. GB To pause playing To pause playing To play a different part of the vinyl record 1 After performing step 4, press the UP/ DOWN button, then lift the tone arm. 2 Move the tone arm to the position you desire. 3 Press the UP/DOWN button. The tone arm descends to the record, then playback starts. To play a 17-cm vinyl record Place the supplied 45 r/min adaptor on the spindle. When you have finished using the adaptor, put it back in the adaptor tray. Recording Audio Tracks on Your Computer You can record audio tracks of a vinyl record on your computer by: • Connecting the turntable and your computer using the supplied USB cable • Using the supplied software, “Sound Forge Audio Studio LE” System requirements for the computer to be connected to the turntable* • Compliant computer: IBM PC/AT or compatible computers • Operating systems: Windows® XP Home Edition Service Pack 2 or higher Windows® XP Professional Service Pack 2 or higher Windows Vista® Home Basic Windows Vista® Home Premium Windows Vista® Business Windows Vista® Ultimate Windows 7 Home Premium Windows 7 Professional Windows 7 Ultimate Pre-installed (manufacturer installed only) – Operating systems other than those listed above are not supported. – Windows XP 64 bit and Windows Vista 64 bit are not supported. – The supplied Sound Forge Audio Studio LE supports Windows XP 32 bit and Windows Vista 32 bit/64 bit. Version 9.0d or higher supports Windows 7 32 bit/64 bit. • Hardware Environment: – Port: USB port** * Required when recording audio tracks of a vinyl record onto a computer via a USB connection. **The USB jack of the turntable supports USB (full- speed). Operations Continued . GB Notes Notes For the operating environment mentioned above, the turntable is not guaranteed to operate with all computers. • The turntable is not guaranteed to operate with home built computers, operating systems that are personally up-graded or multiple operating systems. • The turntable is not guaranteed to operate with functions such as system suspend, sleep (stand-by mode) and hibernation, on all computers. Installing the supplied software Before recording, install the supplied software, “Sound Forge Audio Studio LE.” Once you install the software into your computer, you do not have to install it again other than that you need to re-install it. 1 Insert the supplied CD-ROM into the CD drive of your computer. 2 Install the software according to on- screen instructions. Tip For details about installing the software, refer to the “Sound Forge Audio Studio LE” installation guide. Connecting the USB cable Connect the turntable and the computer with the supplied USB cable. To the USB jack USB cable (supplied) To the USB port Computer (not supplied) 10GB Notes Notes .Connect the USB cable into the USB jack/USB port securely, or may cause a malfunction. .Disconnect the USB cable when it is not in use , or it may cause noise. .When the turntable and computer are connected via USB cable, the audio that is adjusted with the turntable equalizer is input to the USB port of the computer, when playing the turntable to record audio tracks on your computer. Tip USB drivers are included in operating systems if you are using Windows XP, Windows Vista or Windows 7. USB drivers will be installed automatically when the system is connected to the computer for the first time. For details, refer to the manual of your computer. Setting up your computer: Windows XP ([Control Panel] is in [Category View]) 1 Select [Control Panel] from the [Start] menu. 2 Click [Sounds, Speech, and Audio Devices]. 3 Click [Sounds and Audio Devices]. 4 Click the [Audio] tab. 5 Select [USB Audio CODEC] for [Default device:] of [Sound recording]. 6 Click [OK]. Setting up your computer: Windows Vista ([Control Panel] is in the [Control Panel Home] view) 1 Select [Control Panel] from the [Start] menu. 2 Click [Hardware and Sound]. 3 Click [Sound]. 4 Click the [Recording] tab. 5 Select [USB Audio CODEC] for [Microphone]. 6 Click [Set default]. 7 Select [USB Audio CODEC], then click [Properties]. 8 Click the [Advanced] tab. 9 Select [2 channel, ...] (ex: [2 channel, 16 bit, 44100 Hz (CD Quality)]) from the [Default Format] drop-down list. 10 Click [OK]. Note .To input stereo signal from the turntable to the computer, performing steps 7 through 10 is necessary. .You can set the signal input level for Windows Vista SP1 or higher. For details, refer to your computer’s operating instructions. Operations Continued . 11GB Setting up your computer: Windows 7 ([Control Panel] is in t...