


Assessments - 2, GPA: 4
(

 )
)
|
Fotos e especificações Yamaha AV-1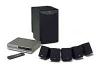 |


Facilidade de uso
ACCESSOIRES FOURNIS l Apres le deballage, verifier que les pieces suivantes sont incluses. MITGELIEFERTES ZUBEHOR l Nach dem Auspacken uberprufen, ob die folgenden Teile vorhanden sind. MEDFOLJANDE TILLBEHOR l Kontrollera efter det apparaten packats upp att foljande delar finns med. ACCESSORI IN DOTAZIONE l Verificare che tutte le parti seguenti siano contenute nell’imballaggio dell’apparecchio. ACCESORIOS INCLUIDOS l Desembale el aparato y verificar que los siguientes accesorios estan en la caja. BIJGELEVERDE ACCESSOIRES l Controleer na het uitpakken of de volgende onderdelen voorhanden zijn. l Remote control transmitter l Telecommande l Fernbedienung l Fjarrkontroll l Telecomando l Controlador remoto l Afstandbediening l Batteries (size AA, UM/SUM-3, R6, HP-7) l Piles (format AA, UM/SUM-3, R6, HP-7) l Batterien (Gro.e AA, UM/SUM-3, R6, HP-7) l Batterier (Storl. AA, UM/SUM-3, R6, HP-7) l Batterie (dimensioni AA, o UM/SUM-3, o R6, o HP-7) l Pilas (tamano AA, tipo UM/SUM-3, R6, HP-7) l Batterijen (maat AA, UM/SUM-3, R6, HP-7) l AM (MW/LW) loop antenna l Cadre-antenne AM (PO/GO) l MW/LW-Rahmenantenne l AM (MV/LV) ramantenn l Antenna ad anello per AM (MW e LW) l Antena de cuadro AM (OM/OL) l AM (MW/LW) lusantenne l Indoor FM antenna l Antenne interieure FM l UKW-Innenantenne l FM inomhusantenn l Antenna FM per interni l Antena interior de FM l FM binnenantenne l Audio connection cord l Cable de connexion audio l Audio-Anschlu.kabel l Audio anslutningssladdar l Cavo di collegamento audio l Cable de conexion de audio l Audio aansluitkabel l System connector cable l Cable de connexion du systeme l System-Verbindungskabel l Systemkontrollkabel l Cavo di collegamento del sistema l Cable de conexion del sistema l Systeemaansluitkabel l Speaker cords l Cables d’enceintes l Lautsprecheranschlu.kabel l Hogtalarledningar l Cavi per gli altoparlanti l Cables de los altavoces l Luidsprekerdraden l Mounting brackets l Supports de montage l Befestigungshalterungen l Monteringsfasten l Staffe di montaggio l Mensulas de instalacion l Montagesteunen l Screws l Vis l Schrauben l Skruvar l Viti l Tornillos l Schroeven l Tag sheet (for speaker cords) l Plaquette d’etiquettes (pour les cordons d’enceinte) l Markierungsflagge (fur Lautsprecherkabel) l Etikettark (for hogtalarledningar) l Cartellini (per i cavi degli altoparlanti) l Hoja de etiquetas (para los cables de altavoz) l Etikettenvel (voor luidsprekerkabels) TUNER CD DSP AMP 2 3 (A) (B) 2 5 (C) FRONTL FRONT L FRONTL FRONTL FRONTR FRONT R FRONTR FRONTR CENTER C CENTERC CENTERC CENTER C REAR L REARL REARL REAR L REAR R REARR REARR REAR R (A) (B) ENGLISH INTRODUCTION English Thank you for purchasing this YAMAHA product. We hope it will give you many years of trouble-free enjoyment. For the best performance, read this manual carefully. It will guide you in operating your YAMAHA product. A Brief Guide to Proper Use of This System and The Owner’s Manual The following procedure shows you how to begin using this system and the owner’s manual from the time just after you bought this system. 1. Unpack the package, and check the contents. (Refer to the inside of the cover and page 6.) 2. Read “PRECAUTIONS” on this manual (on pages 3 to 5) first of all. 3. To understand this system, see pages 6 to 8. 4. Position and install all units in this system (see pages 9 to 11), and then make connections (see pages 12 to 17). Do not plug in this system until all connections are completed. 5. Before listening to a source, make some adjustments. (See pages 24 to 27.) 6. Begin listening to a source. (See pages 28 to 29.) . To listen to a compact disc, see pages 30 to 32. . To listen to a radio program, see pages 33 to 37. (For U.K. and Europe models only, see pages 33 to 43.) . To listen to or watch a source played on an external unit, see page 44. 7. To enjoy listening to a source with surround sound effects, see pages 45 to 48. . To use the built-in timer, see pages 49 to 51. . If you want to know the function of a button, switch or indicator, see pages 18 to 23. E-1 CONTENTS Page PRECAUTIONS PRECAUTIONS ........................................................3-4 NOTES ABOUT THE REMOTE CONTROL TRANSMITTER............................................................5 OUTLINE OF THIS SYSTEM SYSTEM CONFIGURATION .......................................6 FEATURES ..................................................................7 DIGITAL SOUND FIELD PROCESSOR (DSP) ...........8 SETTING UP THE SPEAKERS SETTING UP THE SPEAKERS..............................9-11 CONNECTIONS CONNECTIONS....................................................12-17 CONTROLS AND THEIR FUNCTIONS CONTROLS AND THEIR FUNCTIONS................18-23 TURNING THE POWER TO THIS SYSTEM ON OR IN THE STANDBY MODE TURNING THE POWER TO THIS SYSTEM ON OR IN THE STANDBY MODE ...................................24 ADJUSTMENTS BEFORE LISTENING OPERATIONS SETTING THE CLOCK ..............................................25 ADJUSTING BRIGHTNESS OF THE ...