


Assessments - 4, GPA: 4.5
(

 )
)
|
Fotos e especificações Sony DAV-DZ880W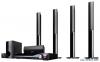 |


por este dispositivo também tem outras instruções :

Home theater - DAV-DZ880W (517.05 kb)
Home theater - DAV-DZ880W (5.41 mb)
Facilidade de uso
• To set the ID of the S-AIR receiver, refer to the operating instructions of the S-AIR receiver. 3 Press SYSTEM MENU. 4 Press X/x repeatedly until “PAIRING” appears in the front panel display, then press or c. 5 After “START” appears in the front panel display, press . The unit starts pairing and “SEARCH” flashes in the front panel display. To cancel pairing, press SYSTEM MENU. 6 Start pairing of the S-AIR sub unit. x For the surround amplifier Press POWER on the surround amplifier to turn on the surround amplifier and press PAIRING on the rear panel of the surround amplifier. The PAIRING indicator of the surround amplifier flashes red when pairing starts. When sound transmission is established, the PAIRING indicator of the surround amplifier turns red and “PAIRING” and “COMPLETE” appear alternately in the front panel display. Tip • To press PAIRING on the rear panel of the surround amplifier, a slim instrument, such as a paper clip, can be used. x For the S-AIR receiver Refer to the operating instructions of the S-AIR receiver. When sound transmission is established, “PAIRING” and “COMPLETE” appear alternately in the front panel display. Note • Perform pairing within several minutes of Step 5. If you do not, “PAIRING” and “INCOMPLETE” appear alternately in the front panel display. To continue pairing, press and start again from Step 5. To cancel pairing, press SYSTEM MENU. 7 Press SYSTEM MENU. The system menu turns off. 92GB To cancel pairing Perform the ID setting of the unit according to the procedure of “To set the ID of the unit.” If you select a new ID, pairing is canceled. If sound transmission is unstable For the surround amplifier For the S-AIR receiver If you use multiple wireless systems which share the 2.4 GHz band, such as wireless LAN or Bluetooth, the transmission of S-AIR products or other wireless systems may be unstable. In this case, the transmission may be improved by changing the following “RF CHANGE” setting. 1 Press SYSTEM MENU. 2 Press X/x repeatedly until “RF CHANGE” appears in the front panel display, then press or c. 3 Press X/x to select the desired setting. •“AUTO”: Normally select this. The system changes “RF CHANGE” to “ON” or “OFF” automatically. • “ON”: The system transmits sound by searching for the better channel for transmitting. • “OFF”: The system transmits sound by fixing the channel for transmitting. 4 Press . The setting is made. 5 Press SYSTEM MENU. The system menu turns off. 6 When you set “RF CHANGE” to “OFF,” select the ID so that sound transmission is most stable (page 89). Note • In most cases, you will not need to change this setting. – If “RF CHANGE” is set to “OFF,” transmission between the unit and S-AIR sub unit can be performed using one of the following channels. – S-AIR ID A: equivalent channel for IEEE 802.11b/g channel 1 – S-AIR ID B: equivalent channel for IEEE 802.11b/g channel 6 – S-AIR ID C: equivalent channel for IEEE 802.11b/g channel 11 • The transmission may be improved by changing the transmission channel (frequency) of the other wireless system(s). For details, refer to the operating instructions of the other wireless system(s). Control for HDMI/ External Audio Device 93GB Other Operations Other Operations Getting Optimal Surround Sound for a Room [SPEAKER FORMATION] Depending on the shape of the room, you cannot install some speakers. For better surround sound, Sony recommends that first you decide the position of the speakers. 1 Press FUNCTION +/– repeatedly until “DVD” appears in the front panel display. 2 Press DISPLAY while the system is in stop mode. The Control Menu display appears on the TV screen. 3 Press X/x to select [SETUP], then press . The options for [SETUP] appear. 4 Press X/x to select [CUSTOM], then press . The Setup Display appears. 5 Press X/x to select [AUDIO SETUP], then press . The options for [AUDIO SETUP] appear. 6 Press X/x to select [SPEAKER FORMATION], then press . The options for [SPEAKER FORMATION] appear. 7 Press C/c to select a setting. • [STANDARD]: Select this when you install all the speakers normally. • [NO CENTER]: Select this when you install the front and surround speakers only. • [NO SURROUND]: Select this when you install the center and front speakers only. • [FRONT ONLY]: Select this when you install the front speakers only. • [ALL FRONT]: Select this when you install all the speakers in front of the listening position. • [ALL FRONT - NO CENTER]: Select this when you install the front and surround speakers in front of the listening position. 8 Press . The setting is made and the confirmation display appears. 9 Press C/c to select [YES] or [NO], then press . • [YES]: Continue with [AUTO CALIBRATION]. Follow the procedure from Step 7 of “Calibrating the Appropriate Settings Automatically” (page 95). • [NO]: Exit [SPEAKER FORMATION]. SPEAKER FORMATION STANDARD 94GB Calibrating the Appropriate Settings Automatically [AUTO CALIBRATION] D. C. A. C. (Digital Cinema Auto Calibration) can set the appropriate...
Este manual também é adequado para os modelos :Home theater - DAV-DZ380W (1.76 mb)
Home theater - DAV-DZ680W (1.76 mb)