


Assessments - 2, GPA: 4
(

 )
)
|
Fotos e especificações Makita 2106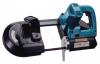 |


Facilidade de uso
7.Hold the tool firmly with both hands. 8. When cutting metals, be cautious of hot flying chips. 9. Do not leave the tool running unattended. IO. Do not touch the blade or the workpiece immediately after operation; they may be extremely hot and could burn your skin. SAVE THESE INSTRUCTIONS. Switch action To start the tool, simply pull the trigger. I Lock button Release the trigger to stop. For continuous 1 operation, pull the trigger and then push in 1 Trigger switch the lock button. To stop the tool from the 1 locked position, pull the trigger fully, then release it. CAUTION: Before plugging in the tool, always check to see that the trigger switch actuates properly and returns to the "OFF" position when released. Speed change To change the tool speed, press the "H" side of the speed change switch for high speed or the "L" side for low speed. CAUTION : Do not change the tool speed while the motor is running. Installingor removing blade CAUTION : Always be sure that the tool is switched off and unplugged before installing or removing the blade. Oil on the blade can cause the blade to slip or come off unexpectedly. Wipe off all ex- cess oil with a cloth before installing the blade. 0 Use caution when handling the blades so that you are not cut by their sharp teeth Turn the blade tightening lever clockwise until it hits against the protrusion on the Blade tightening lever frame. Match the direction of the arrow v on the blade to that of the arrow on the wheels. Insert the blade between the bearings of one blade guide first and then into the other blade guide. The blade back should Bearing Blade , , contact the bearings in the lower portion of the blade guides. r\-\ Blade guide Position the blade around the wheels and Blade guide insert the other side of the blade within the IT--- Hold the blade in place and turn the blade tightening lever counterclockwise until it hits against the protrusion on the frame. This places proper tension on the blade. Make sure that the blade is correctly positioned within the blade guard and around the wheels. Start and stop the tool two or three times to make sure that the blade runs properly on the wheels. CAUTION : While making sure that the blade runs on the wheels properly, keep your body away from the blade area. To remove the blade, follow the installation procedures in reverse. CAUTION : When turning the blade tightening lever clockwise to release the tension on the blade, the blade may come off unexpectedly. Be careful. Installing stopper plate (For Model 2106 only) This tool is shipped from the factory without the stopper plate installed. Install the stopper plate as follows. Install the stopper plate on the frame so that the blade can run through the slot in the stopper plate. While pressing the stopper plate against the frame, secure the stopper plate with the bolts using the hex wrench. Squaring blade with stopper plate Use the triangular rule to make sure that the side of the blade is square with the side of the stopper plate. If not square, loosen the bolts securing the stopper plate and adjust the stopper plate accordingly. Triangular rule Cutting lubricant When cutting metals, use Makita cutting wax as a cutting lubricant. To apply the cutting wax to the blade teeth, start the tool and cut in to the cutting wax as shown in the figure. CAUTION : 0 Never use cutting oil or apply excessive amount of wax to the blade. It may cause the blade to slip or come off unexpectedly. 0 When cutting cast iron, do not use any cutting lubricant. Cutting operation ,o,x, It is important to keep at least two teeth in the cut. Select the proper cutting position for your workpiece by refering to the figure at right. Hold the tool as shown in the figure with the stopper plate contacting the workpiece and the blade clear of the workpiece. Turn the tool on and wait until the blade attains full speed. Gently lower the blade into the cut. The weight of the tool or slightly pressing the tool down will supply adequate pressure for the cutting. Do not force the tool. As you reach the end of a cut, release pressure and, without actually raising the tool, lift it slightly so that it will not fall against the workpiece. CAUTION : 0 Applying excessive pressure to the tool or twisting of the blade may cause bevel cutting or damage to the blade. 0 When not using the tool for a long period of time, remove the blade from the tool. MA1 NTENANCE CAUTION : Always be sure that the tool is switched off and unplugged before attempting to perform inspection or maintenance. Cleaning After use, remove wax, chips and dust from the tool, wheel tires and blade. CAUTION : 0 Never use solvents such as turpentine, gasoline, lacquer, etc. to clean plastic parts. 0 Wax and chips on the tires may cause the blade to slip and come off unexpectedly. Use a dry cloth to remove wax and chips from the tires. Replacing tires on wheels When the blade slips or does not track pro- perly because of badly worn tires, or the Wheel li...
Este manual também é adequado para os modelos :Jig Saw e - 2106K (768.92 kb)