


Assessments - 5, GPA: 3.4
(


 )
)
|
Fotos e especificações Roland CM-30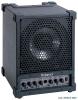 |


Facilidade de uso
Peeling such matter off the instrument may damage the exterior finish. Maintenance • For everyday cleaning wipe the unit with a soft, dry cloth or one that has been slightly dampened with water. To remove stubborn dirt, use a cloth impregnated with a mild, non-abrasive detergent. Afterwards, be sure to wipe the unit thoroughly with a soft, dry cloth. • Never use benzine, thinners, alcohol or solvents of any kind, to avoid the possibility of discoloration and/or deformation. Additional Precautions • Use a reasonable amount of care when using the unit's buttons, sliders, or other controls; and when using its jacks and connectors. Rough handling can lead to malfunctions. • When connecting / disconnecting all cables, grasp the connector itself—never pull on the cable. This way you will avoid causing shorts, or damage to the cable's internal elements. • A small amount of heat will radiate from the unit during normal operation. • To avoid disturbing your neighbors, try to keep the unit's volume at reasonable levels. You may prefer to use headphones, so you do not need to be concerned about those around you (especially when it is late at night). • When you need to transport the unit, package it in the box (including padding) that it came in, if possible. Otherwise, you will need to use equivalent packaging materials. • Use a cable from Roland to make the connection. If using some other make of connection cable, please note the following precautions. - Some connection cables contain resistors. Do not use cables that incorporate resistors for connecting to this unit. The use of such cables can cause the sound level to be extremely low, or impossible to hear. For information on cable specifications, contact the manufacturer of the cable. 5 Panel Descriptions ■ Control Panel © 1 MIC/LINE LINE LINE X 0 10 0 10 0 10 LEVEL PHONES J® 0 10 LOW HIGH - + - + MASTER , 0 10 niiin mi POWER Ü CM-30 I I © ® 1 ® © © ■ Jack Panel 6 Panel Descriptions 1. CH 1 knob / CH 1 Input Jacks In addition to a 1/4" phone jack, this channel is equipped with a balanced XLR connector, useful for connecting microphones. This accepts input levels ranging from mic input (-50 dBu) to line level from sound modules and other equipment (-20 dBu). * The pin assignment for the XLR type connectors is as shown below. Before making any connections, make sure that this pin assignment is compatible with that of all your other devices. 0 ©:GND (2): HOT (3): COLD 2. CH 2 and CH 3 knobs / CH 2 and CH 3 Input Jacks Use these for connecting keyboards, sound modules, and other devices. You can make stereo connections to these inputs. If you connect only the L jack, the input will be mono. If you're using stereo connections, you can listen in stereo through headphones or when using a pair of stereo-linked CM-30 speakers. They accept line level input (-20 dBu). 3. STEREO PHONES The headphones allow you to listen in stereo. LEVEL Knob This knob adjusts the headphones volume. PHONES Jack This is for connecting headphones. * Before plugging in or unplugging headphones, be sure to place the LEVEL knob at 0. 4. EQUALIZER LOW Knob This adjusts the level of the bass range. HIGH Knob This adjusts the level of the treble range. 5. MASTER Knob This adjusts the total volume level of the unit's internal speaker. 6. Power Indicator This indicator illuminates when the power is on. 7. POWER Switch This switches the power on and off. * Always be sure to lower the MASTER knob on the CM-30 to 0 whenever turning the power on or off. * This unit is equipped with a protection circuit. A brief interval (a few seconds) after power up is required before the unit will operate normally. Slight pop noise may come from the speakers when the power is switched on, but this does not indicate a problem. * Refer to p. 9 for the order in which to turn the power to connected devices on and off. 8. AUX IN 1, 2 Jacks AUX IN 1 are RCA phono type input jacks. AUX IN 2 is stereo miniature phone type input jack. You use these to connect equipment such as CD and MD players, and have them sound along with the equipment connected to CH 1 through CH 3. Both AUX IN 1 and 2 accept level input of -10 dBu. * To adjust the volume level of equipment connected to the AUX IN jacks, use the controls on such equipment. 9. STEREO LINK Stereo playback is enabled simply by connecting two CM-30 units with a single or double audio cables (phone type). * For details on the Stereo Link function, refer to "Using Two CM-30 Speakers for Stereo Playback (Stereo Link)" (p. 10). They provide -10 dBu line level output, and accept level input of -10 dBu. 10. AC IN Jack Connect the included power cord to this jack. * Use only the power cord included with the CM-30. 7 Making the Connections Refer to the figure shown below to connect the CM-30 and the other equipment. Control Panel Recorder Keyboard '".--[□I OUTPUT R L(MONO) R L (MONO) 'o © id R—OUT—L IN Mic S...