


Assessments - 1, GPA: 5
(
 )
)
)
|
Fotos e especificações Roland HPi-6s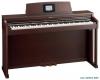 |


Facilidade de uso
• You cannot save songs to CDs, and you cannot delete songs recorded to CDs. Furthermore, you cannot format CDs. ¦ Connecting a CD Drive NOTE CD drives that draw their power from the USB connector cannot be used. External Memory Connector Holder External Memory Connector 1. Turn off the power to the HPi-6S and the CD drive to be connected. 2. Connect the USB cable included with the CD drive to the External Memory connector on the HPi-6S. 3. Turn on the power to the connected CD drive. 4. Turn on the power to the HPi-6S. NOTE For information on how to perform the following CD-drive operations, refer to the owner’s manual for the drive. • Switching the power on and off • Inserting and ejecting a CD Memo 22 Panel Descriptions Front Panel 1. [Power] switch Pressed to switch the power on and off (p. 17). 2. [Volume] knob Adjusts the overall volume of the HPi-6S (p. 18). If headphones are connected, this adjusts the headphone volume (p. 18). 3. One Touch [ ] button Makes the optimal settings for a piano performance (p. 50). 4. [Reverb] button Adds reverberation to the sound (p. 54). 5. [Key Touch] button Adjusts the touch of the keyboard (p. 53). 6. Tone buttons (Piano, E. Piano, Organ, Strings, Others) Select the type of sound (the tone group) that will be played from the keyboard (p. 51). 7. [ (Song)] button Use this button to select internal songs or songs from USB memory (p. 41–p. 48, p. 60, p. 71–p. 78). 8. [ (Notation)] button Displays the notation in the screen in the panel center (p. 26, p. 27, p. 99). 9. [Menu/Lesson] button You can enjoy practices using the “DoReMi Course,” “Twin Piano,” “Visual Lesson,” and other lesson functions (p. 32– p. 40). Here you can also enjoy the “Drums,” “SFX,” and “Game,” and learn about instruments while having fun (p. 30). Selects various performance-related functions (p. 87–p. 105, p. 108–p. 110). 10. [ ] [ ] buttons Press the [ ] button to confirm the selections you’ve made using the Cursor button (11) (p. 25). The [ ] cancels the operation, or displays the notation screen. 11. Cursor button Used to select the item that you want to set (p. 25). Also used to select values in some screens. 12. Tempo [Slow] [Fast] buttons Adjust the tempo (p. 63). Simultaneously pressing the [Slow] and [Fast] buttons will restore the basic tempo. 13. [ (Metronome)] button Sounds the internal metronome (p. 64). Front Panel 2 1 3 4 5 6 7 8 9 21 22 23 24 25 Panel Descriptions 10 11 10 12 13 14 15 16 17 18 19 20 Panel Descriptions 10 11 10 12 13 14 15 16 17 18 19 20 14.[Count/Marker] button This is used for setting the count (p. 65). This allow you to add and move markers in the notation as well as repeat playback of song segments simply and easily (p. 67). 15.[ (Reset)] button Resets the song playback-start location to the beginning of the song. 16.[ (Play/Stop)] button This starts and stops playback and recording of songs. 17.[ (Rec)] button This lets you record your own performance into the HPi-6S (p. 70–p. 78). 18.[ (Bwd)] button Rewinds the song. 19.[ (Fwd)] button Fast-forwards the song. 20.Track buttons (R/Rhythm, 1/User, 2/Accomp, 3/Left, 4/Right) Used to play back or record each track of a song (p. 60, p. 74, p. 76, p. 77, p. 78). HPi-6S’s Bottom Panel (Front Side Left) 21.USB (MIDI) connector Used for connecting a computer to the HPi-6S using a USB cable (p. 109). 22.MIDI Out/In connector An external MIDI device can be connected here to receive performance data (p. 107). 23.Phones jacks A set of headphones can be connected here (p. 18). HPi-6S’s Bottom Panel (Front Side Right) 24.External memory connector Here you can connect USB memory, a floppy disk drive, or a CD drive, and play back stored songs (p. 41). You can also use USB memory to save a song you’ve recorded on the HPi-6S (p. 81). By rotating the base you can neatly store the USB memory or USB cable. * Use USB memory available from Roland. Proper operation cannot be guaranteed if other USB Memory products are used. * CD drives that draw their power from the USB connector cannot be used. 25.Input jacks Here you can connect a portable audio player or another electronic musical instrument, and listen to the connected device through the HPi-6S’s speakers (p. 106). 24 Panel Descriptions Rear Panel 1. LCD Out connector Connect the LCD cord of the music rest to this connector (p. 16). HPi-6S’s Bottom Panel (Rear Side) 2. Input jacks These jacks can be connected to another sound generating device or an audio device, so that the sound of that device will be output from the HPi-6S’s speakers (p. 106). 3. Output jacks These jacks can be connected to your audio system to enjoy more powerful sound. They can also be connected to a tape recorder or similar device in order to record your performance on a cassette tape (p. 106). 4. Pedal jack Connect the pedal cord of the stand to this jack (p. 16). 5. AC Inlet Connect the included power cord to this inlet (p. 16). Music Rest fig.MusicRestFront fig.MusicRestRear 6. Display This displays notat...