


Assessments - 4, GPA: 3.5
(


 )
)
|
Fotos e especificações Yamaha NS-PA40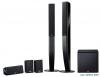 |


Facilidade de uso
The wire which is coloured BROWN must be connected to the terminal which is marked with the letter L or coloured RED. Make sure that neither wire is connected to the earth terminal of a three pin plug. Caution For safe and proper use of the speaker: • Position the speaker in a location that is solid, level, The speaker is constructed with the majority of the smooth, and low (with respect to the floor). weight located in its upper • Do not push or apply pressure to the side of the portion, and is thus speaker when moving, or lean objects against the susceptible to falling over if side of the speaker. proper care is not taken to • Do not sit on or set objects on top of the speaker. ensure its stability. If the Vibrations or jolts associated with earthquakes and speaker tips over, the speaker other phenomena or activities may cause the speaker to or other personal property fall over. For safety reasons, using commercially- may be damaged or an individual may be injured available products that increase stability of the speaker (possibly even fatally injured). is recommended (metal fittings or chains, etc.). Contents Package contents................................................1 Connecting the speakers..................................4 Assembling the front speakers ........................1 Connection diagram.............................................4 Connecting the power cables ..............................6 Installing the speakers.......................................3 Installing the front, center, and surround Using the Subwoofer ......................................... 6 speakers ...........................................................3 Setting the subwoofer volume .............................6 Installing the subwoofer.......................................3 Troubleshooting ................................................. 7 Wall-mounting the speakers................................3 Specifications...................................................... 7 If this product doesn’t work as expected, look for a possible cause in the troubleshooting section on page 7. If the issue you are experiencing is not listed, or you cannot resolve it after reading through these instructions, disconnect the power cable and contact an authorized Yamaha dealer or service center. ii En Package contents Package contents • Make sure that all parts are included in the package. • Pay attention not to drop the bases when you take them out of the box. Subwoofer (NS-SW40) x1 Front speaker (NS-F40) x2 Surround speaker (NS-B40) x2 Center speaker (NS-C40) x1 Non-skid pads (24 pcs.) x1 For the center and surround speakers. (Including 12 spare non-skid pads.) Screw x10 (For the front speakers) When placing the speakers on a flat surface, affix the included non-skid pads to the corners of the speaker Top Bottom Base Non-skid pad undersides, as shown. The pads will prevent the speaker from moving around. Subwoofer cable 5 m (16 ft.) x1 Speaker cable 24.5 m (80 ft.) x1 To be cut into 5 lengths for the front, center, and surround speakers. Take care to prevent injury when preparing the cables. Assembling the front speakers Caution • Assemble the speakers on top of soft material, such as a carpet, on a level surface. • Do not grab the grilles on the front panel of the speakers while you are taking them out of the package box orassembling them. Otherwise, the grilles may be crushed. • Install the speakers using the specified screws supplied in the package. • Keep the screws out of reach of children to prevent them from accidentally swallowing a screw. • Tighten the screws firmly so that the front speaker never gets shaky. • Do not insert your fingers into any gaps between movable surfaces. Otherwise, you may pinch and injure yourfingers. • You cannot use only the speaker top. Be sure to assemble the speaker top, bottom and base. Note Have a Phillips (+) screwdriver (with a shaft length of 80 mm (3-1/8") or more) ready to use during assembly. Shaft length 80 mm (3-1/8") or more 1 En Assembling the front speakers 1 Attach the Base to the Bottom. 1 Insert the three projections on the Base into the three holes on the lower end surface of the Bottom. Make sure that the notch on the Base faces in the same direction as the rear panel of the Bottom, which includes a groove for a speaker cable. 2 Insert four screws (included in the package) from the underside of the Base to affix the base to the Bottom. First finger-tighten each screw alternately, then tighten them all securely. 2 Attach the Top to the Bottom. Top 1 Place the assembled Bottom and Base on the side) floor as shown in the figure. Place the Top on the Bottom so that the Top will sit slightly toward the front (by approx. 15 mm (5/8")). 2 Slide the Top slowly toward the rear until it stops and the rear panel of the Top aligns with the rear of the Bottom. 3 Attach the Bottom to the Top by using a Phillips screw driver to securely tighten the supplied screws. Rotate approximately tw...