


Assessments - 1, GPA: 5
(
 )
)
)
|
Fotos e especificações Samsung RCD-S50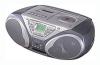 |


Facilidade de uso
n Specifications...............................................................................................................26 GB 2 Front Panel View 3 GB 123456 789 10 11 12 13 14 15 16 17 18 19 20 21 22 23 24 25 1. Pause 2. Stop/Eject 3. F.Fwd 4. Rewind 5. Play 6. Record 7. CD Play/Pause 8. Repeat AOB (refer to p.15) 9. TUNER 10. Standby/On 11. Program 12. Memory 13. Phones (refer to p.25) 14. Timer/Clock (refer to p.6,23) 15. EQ Preset (refer to p.25) 16. CD Stop (n) 17. Skip or Search (refer to p.12) 18. Volume 19. S.Bass (refer to p.26) 20. CD Push Open 21. TAPE 22. MIC (refer to p.21) 23. Mono/Stereo (refer to p.10) 24. Sleep (refer to p.22) 25. Clock Display Power Sources House Current GB 0 BEAT-CUT 1 n 1 to AC IN 2 to wall outlet n AC power cord (supplied) n Voltage selector(option) VOLTAGE SELECTOR Adjusting the voltage(only for the models equipped with 220-240V 110-127Vthe VOLTAGE SELECTOR at the back) Be sure to set the VOLTAGE SELECTOR (inside the battery compartment) to your local power supply. Batteries CLOCK BATTERY 4.5V; AA,Size X 3 12V; D, DM, UM-1, R20, HP2....., size X 8 For critical recordings or disc playing Operating the unit using the AC power is recommended. Note: The unit will not operate from the internal batteries while the AC power cord is connected to the unit. Be sure to install batteries (“AA” x 3) to prevent the program preset in the memory and or the active countdown of the Timer from being cleared accidently in case of power failure of disconnection of the power cord. Back-Light Feature On turing the power on, the light on the function display comes on. This feature helps you to check the operation of the unit even in the dark. (However, while the power is supplied by the batteries, the light on the display does not turn on.) 4 Setting the Clock 5 GB To... Press... Increase the hours .I Decrease the hours I. 1 2 3 For each step, you have a few seconds to set the required options. If you exceed this time, you must start again. Press Timer/Clock twice. Result: CLOCK is displayed. Press Memory button. Result: The hour flashes. To... Press... Increase the minutes .I Decrease the minutes I. 6 When the correct time is displayed, press Memory button. 2 4 6 1 3 5 3 5 4 When the correct hour is displayed, press Memory button. Result: The minutes flash. 5 You can display the time, even when you are using another function, by pressing Clock/Display once. GB 6 Listening to the Radio 3 3 4 1 2 1 2 3 4 Press the Tuning(Down and Up) button. Select the required frequency band by pressing TUNER button again on the front panel. To improve broadcast reception. Reorient the antenna for FM. Reorient the player itself for AM or LW (option). For FM For AM or LW (option) Press the TUNER button. Press the Volume buttons. Searching for and Storing the Radio Stations 7 GB 4 6 1 2 5 7 4 6 3 1 2 5 Select the TUNER function by pressing TUNER. Select the required frequency band by pressing TUNER again on the front panel. Press Memory button. Result: “PROG” and program No. is displayed. 6 Select the desired station by pressing the station number stored, using the I. and.I button. Result: The desired station is now stored. 4 To search for a frequency... Then press... Manually DOWNI. to decrease the frequency UP.I to increase the frequency Result: The frequency changes each time you press the button. Automatically I. or.I and hold it down for at least two seconds. Result: The frequency increases or decreases until the next station is found. 7 Press Memory button to store the radio station. Result: The Program indicator is replaced by the number assigned to the station. To store any other radio frequenies required, repeat Steps 2 to 7. NOTE: The automatic search may stop on a frequency that does not correspond to a radio station. If this happens, use the manual search. You can store up to: u 15 FM stations u 8 MW stations(option) u 7 LW stations(option) 15 AM stations(option) 3 Press the Stop to Select “MANUAL” or “AUTO”. GB 8 Selecting a Stored Station 1 You can listen to a stored radio station as follows: Select the required frequency band by pressing TUNER on the front panel. 3 Select the desired station by pressing the station number stored, using the I. and.I button. Result: The desired station is now received. 3 2 3 1 2 Press stop until “PRESET” is displayed. Improving Radio Reception 9 GB You can improve the quality of radio reception by: u Rotating the FM or AM(MW) aerial u Testing the positions of the FM and AM(MW) aerials before fixing them permanently. If reception from a specific FM radio station is poor, press FM Mode to switch from stereo mode to mono. The quality of the sound will be improved. Mono/Stereo GB 10 Listening to the Compact Disc 1 2 3 Close the door completely. The number of the last tracks in the disc will appear in the LCD. 2 1 3 With the label facing UP. Select the CD function by Pressing CD(AE) . Press the CD (AE) button. TO STOP PLAY To pause Press Play/Pause (AE). To releas...
Este manual também é adequado para os modelos :Jogadores - RCD-S35 (5.17 mb)