


Assessments - 1, GPA: 3
(

 )
)
|
Fotos e especificações Sony DPP-F700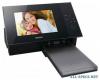 |


por este dispositivo também tem outras instruções :


Facilidade de uso
Shoot. Date Displays images in order of shooting date. Auto display orientation ON*/OFF: Enables or disables the function of automatically changing the image orientation according to the orientation of this unit. LCD backlight Allows you to set the brightness of the backlight of the LCD screen to a level from 1 to 10*. *: Factory default settings Printing in various ways Continued 63 GB Item Item Description General Settings Image import size Resize* When importing images from a memory card, this setting resizes the images and saves them to the internal memory. You can save more images, but deterioration in image quality compared to the original images is noticeable when the images are displayed on a large monitor via a computer or other device. Original Saves images to the internal memory without compressing them. There is no deterioration, but you can save fewer images. Sony logo ON/OFF ON*/OFF: You can set whether this unit’s Sony logo lights or not. Language Setting Sets the display language on the LCD screen. Japanese/English*/French/Spanish/German/Italian/Russian/Korean/Simplified Chinese/ Traditional Chinese/Dutch/Portuguese/Arabic/Persian/Hungarian/Polish/Czech/Thai/Greek/ Turkish/Malay/Swedish/Norwegian/Danish/Finnish Notes • Default language setting may vary in some regions. Initialize Format internal memory You can format the internal memory. Notes • All the images imported to the internal memory will be deleted. • Do not format the internal memory by using a connection to a computer. Initialize settings Returns all settings to their factory defaults except for the current date and time setting of the [Date/time Settings]. *: Factory default settings 64 GB Item Item Description Print Settings Date Print Date/Time Date Prints an image with the date and time of shooting when the image is recorded according to the DCF (Design rule for Camera File system) format and the date and time of shooting is recorded as part of shooting information. You can select [Date] or [Date/Time]. When the image is edited on this unit, the date and time you input in saving an image is printed. OFF* Prints an image without the date and time. Borders Border 1/ Border 2 Prints an image with borders around the image. To print an image without being cut, select [Border 1]. To leave almost-equal borders in the top, bottom, right and left around an image, select [Border 2]. Notes • When you select [Border 2], the top and bottom edges or right and left edges may be trimmed and printed depending on the image. Borderless* Prints an image without blank space around the image. Notes • When printing a standard 4:3 picture shot by a digital camera, the top and bottom edges of the image are cut and it is printed as a 3:2 picture. *: Factory default settings Printing in various ways Continued 65 GB Item Item Description Print Settings Auto Fine Print7 ON* The function automatically corrects the picture quality so that an image may be printed in more vivid, clear and beautiful pictures. It is especially effective for a darker image with low contrast. Notes • The original image data is not corrected. • When printing in PC mode, the Auto Fine Print7 setting with the printer driver has priority over the setting here. OFF Prints an image without any corrections. Pages Per Sheet 4-split/ 9-split/ 16-split Prints the specified numbers of split screens, with each screen an image is placed. OFF* Prints an image without split screens. Color Setting Adjusts the colors and sharpness of a print. Press B/b to select a color element ([R] (red), [G] (green), or [B] (blue)) or [S] (Sharpness), and then press v/V to set the level. You can set the levels for R, G, B in the range from +4 to –4 and for S in the range from +7 to 0. R:Adjusts the red and blue elements. The higher you set the level, the more reddish the picture becomes as if it receives red light. The lower you set the level, the darker the picture becomes as if light blue is added. G:Adjusts the green and purple elements. The higher you set the level, the more greenish the picture becomes as if it receives green light. The lower you set the level, the darker the picture becomes as if red purple is added. B:Adjusts the blue and yellow elements. The higher you set the level, the more bluish the picture becomes as if it receives blue light. The lower you set the level, the darker the picture becomes as if yellow is added. S:The higher you set the level, the more distinct the outlines become. (*R: 0/G:0/B:0/S:0) *: Factory default settings 66 GB 67 GB 67 GB Using the internal memory of this unit Printing from a computer Connecting to a computer lets you do even more Using with a computer Using with a computer Connecting this unit to a computer lets you use the following two functions. For details on mode selection, see page 70. Using the internal memory of this unit ([Use internal memory]) You can browse the internal memory of this unit on the computer. You can also copy images from the computer ...