


Assessments - 4, GPA: 3
(

 )
)
|
Fotos e especificações Oregon Scientific RMR329P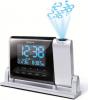 |


Facilidade de uso
Please keep this manual for instructions and information you should know about. CLOCK OVERVIEW FRONT VIEW 1 5 2 6 3 4 1. SNOOZE: Snooze alarm; activate backlight; rotate dual line projection display by 180° 2. ALARM: View alarm status; set alarm 3. CLOCK: Change display; set clock 4. / : Toggle setting options; activate / deactivate clock reception 5. Projector (LED Aperture) 6. TEMP: Toggle in / out temperature settings BACK VIEW 1 3 4 5 6 2 7 8 9 1. FOCUS: Focus the projected image 2. Battery compartment 3. Light sensor 4. PROJECTION: ON / OFF switch 5. LIGHT: Backlight ON / OFF switch 6. °C / °F: Select temperature unit 7. EU / UK: Radio signal switch 8. RESET: Reset settings to default 9. Adapter socket 2 EN EN REMOTE SENSOR To insert batteries: 1. Remove the battery compartment and insert batteries, matching polarities. 2. Press RESET after each battery change. 2 LOCATION MEANING Clock / alarm area Main unit batteries low Outdoor / indoor Sensor batteries low 4 temperature area 3 5 REMOTE SENSOR To set up the sensor: 1. Open the battery compartment, and insert batteries, matching polarities. 1. LED status indicator 2. Place the sensor within 30 m (98 ft) of the main 2. Wall mount hole unit using the table stand or wall mount. 3. Battery compartment 4. RESET hole: Reset unit to default settings 5. CHANNEL button: Select channel 1 GETTING STARTED POWER SUPPLY Batteries serve as a back-up power supply. For continuous use of projector and backlight, install adapter. The socket-outlet shall be installed near the equipment and shall be easily accessible. NOTE will appear when power supply is not connected. The transmission range may vary depending on many factors. You may need to experiment with various locations to get the best results. 3 EN EN NOTE We recommend that you use alkaline batteries with this product for longer usage and consumer grade lithium batteries in temperatures below freezing. SENSOR DATA TRANSMISSION Outdoor sensor: The main unit will automatically search for the outdoor sensor. The sensor reception icon in the remote sensor area shows the status: ICON DESCRIPTION Main unit is searching for sensor(s) A channel has been found The sensor cannot be found. NOTE If the sensor is not found, check the batteries, obstructions, and remote unit location. For best results: • Place the sensor out of direct sunlight and moisture. • Position the sensor facing main unit, minimizing obstructions. • Place the sensor in a location with a clear view to the sky, away from metallic or electronic objects. • Position the sensor close to the main unit during cold winter months. CLOCK CLOCK RECEPTION This product is designed to synchronize its clock automatically with a clock signal. Slide EU / UK to select the signal received. • EU: DCF-77 signal: within 1500 km (932 miles) of Frankfurt, Germany. • UK: MSF-60 signal: within 1500 km (932 miles) of Anthorn, England. To enable / disable signal reception: Press and hold to enable, or to disable signal reception. NOTE Reception takes 2-10 minutes. If the signal is weak, it can take up to 24 hours to get a valid signal. Clock signal reception indicator: STRONG WEAK NO SIGNAL SIGNAL SIGNAL MANUALLY SET CLOCK 1. Press and hold CLOCK for 2 seconds. 2. Press or to change the settings. 3. Press CLOCK to confirm. 4 4. The setting order is: time zone offset, 12/24-hr format, hour, minute, year, day / month format, month, day and language. NOTE Time zone offset sets the clock +/- 23 hours from the received clock signal time. NOTE The language options are (E) English, (F) French, (D) German, (I) Italian, and (S) Spanish. To select display mode: Press CLOCK to choose between clock with seconds and clock with weekday. ALARM To set the alarm: 1. Press and hold ALARM for 2 seconds to enter alarm-setting mode. 2. Press / to set hour / minute. 3. Press ALARM to confirm. indicates alarm is ON. To toggle alarms ON / OFF: 1. Press ALARM to display alarm time. 2. Press ALARM again to turn alarm ON / OFF. To silence the alarms: • Press SNOOZE to silence it for 8 minutes OR • Press any other key to turn the alarm off and activate it again after 24 hours. EN TEMPERATURE To toggle temperature unit: Press °C / °F. To toggle between outdoor / indoor sensor readings: Press TEMP. / indicates indoor and outdoor temperature. To auto-scan between sensors: Press and hold TEMP for 2 seconds to display the sensor’s data for 5 seconds. To deactivate auto-scan function press TEMP. PROJECTOR AND BACKLIGHT To activate Projection function: • Slide PROJECTION switch to ON to illuminate projection continuously. To activate Backlight function: • Slide LIGHT switch to ON to illuminate backlight continuously. OR • Press SNOOZE to turn on projector and backlight for 5 seconds. • Press repeatedly to flip dual line projection image by 180 degrees. NOTE If projection is illuminated, do not look directly into the projector. 5 ENEN NOTE To save battery life, the projector and backlight will only operate continuousl...