


Assessments - 3, GPA: 3.7
(

 )
)
|
Fotos e especificações Canon MD101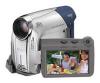 |


por este dispositivo também tem outras instruções :
Facilidade de uso
• Use the optional CV-150F (4 pin-4 pin) or CV-250F (4 pin-6 pin) DV cable. Open the terminal cover to access. Terminal on the Camcorder Connecting Cable Terminal on the Connected Device 1 VIDEO AUDIO R L Output connection (Signal Flow ) to a TV or VCR with AV Terminals. STV-250N Stereo Video Cable (Supplied) Yellow White Red Connecting to a TV or VCR 41 Terminal on the Camcorder Connecting Cable Terminal on the Connected Device 2 Output connection (Signal Flow ) to an HDTV with a DV (IEEE1394) terminal. Input connection (Signal Flow ) from a TV or other digital video source with a DV (IEEE1394) output. CV-150F/CV-250F DV Cable (Optional) 4-pin 6-pin* * Be careful to correctly insert the 6-pin plug into the DV terminal. Inserting it in the wrong direction can result in damage to the camcorder. 3 Output connection (Signal Flow ) to a TV or VCR with a SCART terminal. You will need to connect beforehand a commercially available SCART adapter to the SCART terminal on the TV or VCR and then connect the STV-250N Stereo Video Cable to the adapter. STV-250N Stereo Video Cable (Supplied) Yellow White Red SCART Adapter (Commercially available) External Connections 42 42 Connecting to a TV or VCR Playback on a TV Screen The quality of the playback picture will vary depending on the connected TV and the type of connection used. ( 7) Before making the connections, select the [TV TYPE] setting according to the TV set to which you will connect the camcorder ( 27). Connecting Connect the camcorder to the TV following one of the connection diagrams shown in the previous section Connection Diagrams( 40). Playback 1 Turn on the camcorder and the connected TV or VCR. On a TV: Set the input selector to VIDEO. On a VCR: Set the input selector to LINE (IN). 2 Start the playback of the movies ( 23). NOTES • ..Turn off all the devices before starting the connections. • ..We recommend powering the camcorder using the compact power adapter. Recording to a VCR or Digital Video Recorder You can copy your recordings by connecting the camcorder to a VCR or a digital video device. When recording to a digital video recorder using the DV terminal, you can copy recordings with virtually no generation loss in video and sound quality. Connect the camcorder to the external device following one of the connection diagrams shown in the previous section Connection Diagrams( 40). ( 7) Connecting Connect the camcorder to a VCR or other analog device using connection types or 1 3 , or to a DVD recorder or other digital recording device using connection type 2 , as shown in the previous section Connection Diagrams( 40). Recording 1 This camcorder: Load the recorded cassette. 2 Connected device: Load a blank cassette or disc and set the device to record pause mode. 3 This camcorder: Locate the scene you wish to copy and pause the playback shortly before the scene. 4 This camcorder: Resume the movie playback. When using an analog connection you can include in the copy also the date/ time of the original recording ( 37). 5 Connected device: Begin recording when the scene you wish to copy appears. Stop recording when copying is complete. 6 This camcorder: Stop playback. NOTES • ..We recommend powering the camcorder using the compact power adapter. • ..When recording to a VCR using an analog connection –connection types or 1 ( 3 40)–, the quality of the edited tape will be lower than the original. 43 • ..When recording to a digital video recorder using the DV terminal –connection type ( 2 40)–: -If the picture does not appear, disconnect the DV cable and restore the connection after a short while or turn the camcorder off and then on again. -Proper operation cannot be guaranteed for all digital devices equipped with a DV terminal. If the operation does not work, use the AV terminal. Digital Video Dubbing You can input video from other digital video devices and record the input video on the tape in the camcorder. ( 7) Connecting Connect the camcorder to the video input source using the digital connection –connection type 2 ( 40)– shown in the previous section Connection Diagrams. Dubbing FUNC. ( 17) 1 Load a blank cassette in this camcorder. 2 Connected device: Load the recorded cassette or disc. 3 Press , select ( FUNC. ) [ REC PAUSE] and press ( ). 4 Select ( ) [EXECUTE] and press ( ). 5 Connected device: Start the playback. Connecting to a TV or VCR In record pause mode and while recording you can check the picture on the camcorder’s screen. 6 When the scene you wish to record appears, push the joystick ( ) towards / to begin recording. Recording starts. 7 While recording, push the joystick ( ) towards / to pause the recording. In record pause, push the joystick ( ) towards / again to resume recording. 8 Push the joystick ( ) towards to stop recording. 9 Connected device: Stop the playback. IMPORTANT • ..Blank sections may be recorded as anomalous picture. • ..If the picture does not appear, disconnect the DV cable and restore the connection after a short...
Este manual também é adequado para os modelos :Câmaras de vídeo - MD120 (3.22 mb)
Câmaras de vídeo - MD111 (3.22 mb)
Câmaras de vídeo - MD110 (3.22 mb)