


Assessments - 4, GPA: 3.5
(


 )
)
|
Fotos e especificações Canon Digital IXUS 90 IS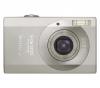 |


por este dispositivo também tem outras instruções :
Facilidade de uso
Read this material before you connect the camera to the computer for the first time. Installing the Software Start by installing the software from the Canon Digital Camera Solution Disk. Items to Prepare • Your camera and computer • Canon Digital Camera Solution Disk • Interface cable supplied with the camera Installation Procedures 1 Close any programs that are running. 2 Place the Canon Digital Camera Solution Disk in the computer’s CD-ROM drive. 3 Double-click the [Canon Digital Camera Installer] icon in the CD-ROM window. 4 Click the Digital Camera Software [Install] button. Installer Panel Macintosh Using the Software on the Macintosh Platform – Preparations 5 Select [Easy Installation] and click [Next]. Select [Custom Installation] to select programs individually for installation. Macintosh 6 Click [Agree] if you agree to all of the terms of the software license agreement. 7 Review the installation settings and click [Next]. Follow the on-screen instructions to proceed with the installation. 8 When the installation is over, click [Finish]. 9 Click [Exit] in the installer panel and remove the disk from the CD-ROM drive. This concludes the software installation. See Uninstalling the Software (p. 66) to delete the software installed with these procedures. Continue by downloading images to the computer (p. 43). 43Using the Software on the Macintosh Platform – The Basics 43Using the Software on the Macintosh Platform – The Basics This chapter explains the procedures for using ImageBrowser to download the camera's images to the computer and print them. Read this chapter after completing the preparations in the Using the Software on the Macintosh Platform – Preparations section. Downloading Images to the Computer Begin by downloading the images to your computer. The downloading procedure is slightly different according to whether you are using a camera to computer connection (see below) or a memory card reader (p. 46). You may not be able to download images when the camera is connected to a computer if there are a large number of images (approximately 1000) on the memory card. Use a memory card reader to download in that case. Camera to Computer Connection 1 After connecting the supplied interface cable to the computer’s USB port and the camera’s DIGITAL terminal, turn on the camera power, set it to playback mode and prepare it to communicate with the computer. Procedures for attaching the camera to the computer and placing the camera in the correct mode for connecting vary between camera models. See the Camera User Guide. Macintosh Using the Software on the Macintosh Platform – The Basics CameraWindow displays when the camera and computer are set to the mode to communicate. (Images are not downloaded at this point.) CameraWindow Thumbnail Window View Window If CameraWindow does not open, click the [CameraWindow] icon in the Dock (the bar at the bottom of the desktop). 2 Download the images using the camera or the computer. By default, the downloaded images are saved into the [Pictures] folder. Using the Camera to Download Images (Direct Transfer Function) Download images using the camera’s Direct Transfer function. •If the conditions are right for the Direct Transfer function, the Direct Transfer settings menu will appear on the LCD monitor and the (Print/Share) button will light blue. •See the Camera User Guide for instructions regarding Direct Transfer settings and procedures. Set the Direct Transfer settings on the camera and press the (Print/Share) button or the FUNC./SET button. The (Print/Share) button will blink blue during the transfer and remain lit when it is complete. Click the mouse button or press any key on the keyboard to resume the ability to operate from the computer. Macintosh Using the Software on the Macintosh Platform – The Basics Using the Computer to Download Images Click [Transfer Untransferred Images]. Thumbnail Window CameraWindow View Window Click this button to close the start screen. •To download images that have had transfer settings set with the camera, use the camera or a memory card reader (p. 46). •To check images in the camera or to download only a portion of the images, click [Operate Images on Camera]. •You can also click in the View Window to upload to the camera images that were downloaded to the computer. When you click [OK] in the image transfer completion window, the transferred images will display in the Main Window. The downloaded images are saved into folders according to the shooting date. The last downloaded images will display here according to both their shooting dates and categories. Folders Area The downloaded symbol displays on downloaded folders. Thumbnail Macintosh Next, print out the images (p. 47). Using the Software on the Macintosh Platform – The Basics Memory Card Reader Connection 1 Insert the memory card into the reader. Use a separately sold card adapter if required. See the manual for the memory card reader for details on how to connect and use ...
Este manual também é adequado para os modelos :Câmaras de vídeo - PowerShot A590 IS (8.18 mb)
Câmaras de vídeo - PowerShot A580 (8.18 mb)
Câmaras de vídeo - PowerShot A470 (8.18 mb)
Câmaras de vídeo - Digital IXUS 970 IS (8.18 mb)