


Assessments - 0, GPA: 5
(
 )
)
)
|
Fotos e especificações Sony DCR-DVD850E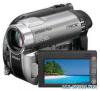 |


por este dispositivo também tem outras instruções :
Câmaras de vídeo - DCR-DVD850E (7.88 kb)
Câmaras de vídeo - DCR-DVD850E (17.05 mb)
Câmaras de vídeo - DCR-DVD850E (16.61 mb)
Câmaras de vídeo - DCR-DVD850E (16.61 mb)
Facilidade de uso
3 Insert the finalized disc into your camcorder. A confirmation screen appears to prompt you to confirm that you wish to record additional movies. 4 Touch [YES] t [YES]. 5 When [Completed.] appears, touch . Utilizing Media Continued , 73 Recording additional movies after finalizing (Continued) b Notes • Do not apply shock or vibration to your camcorder, and do not disconnect the AC Adaptor during the operation. • A DVD menu created during finalizing is deleted. • For a double-sided disc, perform these steps for each side of the disc. Finding the right disc (DISC SELECT GUIDE) Select the option that is right for you on the screen, then you will be informed of the appropriate disc for your purposes. 1 Touch (HOME) t (MANAGE MEDIA) t [DISC SELECT GUIDE]. 2 Touch the option that is right for you on the screen. If you insert the same type of disc as indicated in [DISC SELECT GUIDE], you can format it with your selected settings (p. 71). Repairing the image database file This function checks the image database file and the consistency of movies and still images on the internal memory (DCRDVD450E/ DVD850E), or movies in the “Memory Stick PRO Duo” media, and repairs any inconsistencies found. 1 Touch (HOME) t (MANAGE MEDIA) t [REPAIR IMG.DB F.] t [INT. MEMORY] (DCR-DVD450E/ DVD850E) or [MEMORY STICK]. b Notes • Do not apply mechanical shock or vibration to the camcorder during this operation. • Do not disconnect the AC Adaptor or remove the battery pack. • While the image database file on the “Memory Stick PRO Duo” media is being repaired, do not remove the “Memory Stick PRO Duo” media. • Repairing for the internal memory (DCRDVD450E/ DVD850E) and “Memory Stick PRO Duo” media are performed separately. Utilizing Media 2 Touch [YES]. Your camcorder will check the image database file. When mismatching is not found, touch to finish the operation. 3 Touch [YES]. 4 When [Completed.] appears, touch . 75 Preventing data on the internal memory from being recovered (DCR-DVD450E/DVD850E) [ EMPTY] allows you to write unintelligible data onto the internal memory. In this way, it may become more difficult to recover any original data. When you dispose of or give the camcorder to somebody, it is recommended that you perform [ EMPTY]. b Notes • If you perform [ EMPTY], all the images are deleted. To avoid the loss of important images, dub or copy them on other media (p. 52, 62) before performing [ EMPTY]. • You cannot perform [ EMPTY] unless you connect the AC Adaptor to the wall outlet (wall socket). • Disconnect all cables except the AC Adaptor. • While performing [ EMPTY], do not apply any vibrations or shocks to the camcorder. 1 Connect the AC Adaptor to the DC IN jack on your camcorder, then connect the power cord (mains lead) to the wall outlet (wall socket). 2 Turn on your camcorder. 3 Touch (HOME) t (MANAGE MEDIA) t [MEDIA FORMAT] t [INT. MEMORY]. The screen of formatting the internal memory appears. 4 Touch [EMPTY]. The [ EMPTY] screen appears. 5 Touch [YES] t [YES]. 6 When [Completed.] appears, touch . b Notes • If you stop performing [ EMPTY] while [Executing...] is displayed, be sure to complete the operation by performing [ EMPTY] again before you use the camcorder the next time. Customizing Your Camcorder What you can do with the (SETTINGS) category of the HOME MENU You can change the recording functions and the operating settings for your convenience. Using the HOME MENU 1 Turn on your camcorder, then press (HOME). (HOME) (HOME) (SETTINGS) category 2 Touch (SETTINGS). 3 Touch the desired setup item. If the item is not on the screen, touch / to change the page. 4 Touch the desired item. If the item is not on the screen, touch / to change the page. 5 Change the setting, then touch . Customizing Your Camcorder Continued , 77 What you can do with the (SETTINGS) category of the HOME MENU (Continued) OUTPUT SETTINGS (p. 84) List of the (SETTINGS) category items MOVIE SETTINGS (p. 79) Items Page REC MODE 79 AUDIO MODE*1 79 WIDE SELECT 79 DIGITAL ZOOM 79 STEADYSHOT 80 AUTO SLW SHUTTR 80 GUIDEFRAME 80 REMAINING SET 80 FACE SET*2 80 PHOTO SETTINGS (p. 81) Items Page IMAGE SIZE*2 81 FILE NO. 81 AUTO SLW SHUTTR 80 GUIDEFRAME 80 VIEW IMAGES SET (p. 82) Items Page DATA CODE 82 SOUND/DISP SET*3 (p. 83) Items Page TV TYPE 84 DISP OUTPUT 84 CLOCK/ LANG (p. 84) CLOCK SET*2 23 AREA SET 84 SUMMERTIME 84 Items Page LANGUAGE SET*2 84 GENERAL SET (p. 85) Items Page DEMO MODE 85 CALIBRATION 120 A.SHUT OFF 85 SUB-T DATE 85 *1 DCR-DVD450E/DVD850E *2 You can set these items also during Easy Handycam operation (p. 32). *3 [SOUND SETTINGS] during Easy Handycam operation (p. 32) Items Page VOLUME*2 83 BEEP*2 83 LCD BRIGHT 83 LCD BL LEVEL 83 LCD COLOR 83 MOVIE SETTINGS (Items for recording movies) AUDIO MODE (DCRDVD450E/ DVD850E) Touch 1, then 2. If the item is not on the screen, touch / to change the page. How to set (HOME MENU) t page 77 (OPTION MENU) t page 86 The default settings are marked with B. REC MODE (Recordingmode) You can select a re...
Este manual também é adequado para os modelos :Câmaras de vídeo - DCR-DVD150E (8.42 mb)
Câmaras de vídeo - DCR-DVD450E (8.42 mb)
Câmaras de vídeo - DCR-DVD650E (8.42 mb)