


Assessments - 4, GPA: 3.3
(


 )
)
|
Fotos e especificações Samsung HT-DS100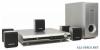 |


por este dispositivo também tem outras instruções :
Facilidade de uso
Press PL II EFFECT button and then press Cursor , buttons to select the mode. Press PL II EFFECT button and then press Cursor , buttons to select the mode. Press PL II EFFECT button and then press Cursor , buttons to select the mode. Note SETUP CMX MPEG-2 AAC MPEG CMX MPEG-2 AAC DSP CMX MPEG-2 AAC MPEG TA TUNED CMX MPEG-2 AAC MPEG Auto Sound Calibration Setup * This function is available only for DVD/CD playback. Auto Sound Calibration By setting the auto sound calibration function just once when you relocate or install the unit, you can have the unit automatically recognize the distance between speakers, levels between channels, and frequency characteristics to create 5.1-channel sound field optimized for the listener's environment. * The following images are for illustrative purposes only and may differ from the actual product. Auto Sound Calibration Microphone L: Front Speaker (L) R: Front Speaker (R) C: Center Speaker SW: Subwoofer LS: Rear Speaker (L) RS: Rear Speaker (R) • If you purchased the unit for the first time or initialized it, pressing the Auto Sound Calibration button without connecting the auto sound calibration microphone will display the message "PLEASE SET ASC FUNCTION FIRST" in the display. • Because the volume level of the tone is fixed during the auto sound calibration setup, you cannot adjust the volume using the volume control buttons. • If the auto sound microphone is disconnected during the auto sound calibration setup, the setup will be cancelled. To Turn the Sound Logo On/Off When you turn on the power, the unit produces a sound logo after the disc is read to notify that the unit is optimized for playback. 1 Press and hold ASC button. •"S.LOGO ON" or "S.LOGO OFF" appears in the display. 2 Briefly press ASC button. • Each time the button is pressed, the selection alternates between S.LOGO ON and S.LOGO OFF. • If you select "S.LOGO ON", a sound logo will be output when the disc reading is finished after power-on. If you select "S.LOGO OFF", no sound logo will be output. To Verify the Auto Sound Calibration 1 • "ASC CHECK" appears in the display. Press and hold ASC button twice. 2 • Distance and level values specified for Briefly press ASC button. each channel will appear in the display. 1 1 Plug the auto sound calibration microphone into the auto sound calibration input jack. 2 2 Place the auto sound calibration microphone at the listener's position. 3 3 Adjust the volume control on the main unit as follows: • If the distance between the listener and the speaker is over 5 m: Set the main unit's volume to over 25. • If the distance between the listener and the speaker is 3 to 5 m: Set the main unit's volume to 25. • If the distance between the listener and the speaker is below 3 m: Set the main unit's volume to 15. 4 4 Press ASC button. • The tone will be output twice, in the given order (L . C . R . RS . LS . SW), and 5.1-channel sound field is optimized automatically. • The auto sound calibration setup takes about 2 minutes to complete. A bell sounds and the setup finishes. A tone is output. A result for each speaker is displayed. 5 5 When the message "REMOVE MIC" appears in the display, unplug the auto sound calibration microphone. To cancel the auto sound calibration setup, press ASC button. • The tone output stops, "CANCEL ASC" appears in the display followed by "REMOVE MIC", and the setup is cancelled. To listen in the auto sound calibration mode, briefly press ASC button. • The selection alternates between ASC ON and ASC OFF in the display. • If you select "ASC ON", you will hear sound in the auto sound calibration mode. If you select "ASC OFF", you will hear sound in the mode set in the audio setting of the setup screen. SETUP Live Surround Mode SUPER 5.1 You can reproduce a 2-channel sound source, such as CD, and radio broadcast, in 5.1-channel surround sound. Press SUPER5.1 button. • Each time the button is pressed, the selection alternates between SUPER 5.1 and SUPER OFF. • Select "SUPER 5.1" to play 2-channel sound in 5.1 channels. MUSIC If you press the MUSIC button when listening to a 2-channel sound source, it will be reproduced in 5.1-channel surround sound so that you can enjoy a dynamic sound with a sense of presence. Press MUSIC button. • Each time the button is pressed, the selection changes as follows: LIVE . JAZZ . ROCK . CLASSIC . DISCO . LSM OFF. MOVIE You can select from 3 different modes of sound field for movies. Press MOVIE button. • Each time the button is pressed, the selection changes as follows: CINEMA . STADIUM . LSM OFF. • When you insert a DVD recorded in 2-channel or multi-channel format and press the SUPER 5.1 button, the message "THIS FUNCTION APPLIES ONLY 2CH SOURCE" appears in the display and it will not work. Virtual Headphone Function Use headphones (not supplied) for private listening pleasure. You can enjoy a dynamic sound effects similar to that of 5.1 channel surround sound using conventional stereo headphones. Plug the Press V-H/P head...
Este manual também é adequado para os modelos :Home theater - HT-DS1000 (8.05 mb)
Home theater - HT-DS1100 (8.05 mb)