


Assessments - 0, GPA: 0
(
 )
)
|
Fotos e especificações Olympus FE-46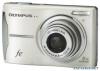 |


por este dispositivo também tem outras instruções :
Facilidade de uso
14 13 Shutter speed .............................p. 14 14 Exposure compensation .............p. 20 15 Compression/frame rate .............p. 24 16 Image size ..................................p. 24 17 ISO..............................................p. 25 18 White balance.............................p. 25 8 EN Playback mode display 12345 1 345 6 7 8 9 10 15 16 11 12M2009.10.262009.10.26 12:30 4 +2.0 F3.5 10 IN x 100-0004 NORM 1/1000 ISO 400 14 13 12 Still image 1 Silent mode.................................p. 33 2 Print reservations/ number of prints.................p. 37/p. 36 3 Adding sound..............................p. 29 4 Protect ........................................p. 28 5 Battery check..............................p. 10 6 Aperture value ............................p. 14 7 Exposure compensation .............p. 20 8 White balance.............................p. 25 9 Image size ..................................p. 24 2009.10.262009.10.26 12:30 100-0004 00:14 /00:34IN QVGA15 1213 8 9 15 10 11 Movie 10 File number....................................... 11 Frame number/ Elapsed time/total recording time ...........................................p. 15/p. 16 12 Current memory..........................p. 46 13 Compression/frame rate .............p. 24 14 ISO..............................................p. 25 15 Date and time .............................p. 12 16 Shutter speed .............................p. 14 EN 9 Pr eparing the Camer a Attaching the camera strap Pull the strap tight so that it does not come loose. Loading the batteries and the xD-Picture Card™ (sold separately) into the camera Do not insert anything other than an xD-Picture Card or the microSD Attachment into the camera. 1 1 3 2 Battery/card compartment cover 2 For the types of batteries that can be used, see “Battery handling precautions” (p. 45). When using NiMH batteries, be sure they are fully charged, and select [NiMH] for [BATTERY TYPE]. [BATTERY TYPE] (p.33) Turn off the camera before opening the battery/card compartment cover. When using the camera, be sure to close the battery/card compartment cover. When to replace the batteries Replace the batteries when the error message shown below appears. Flashes in red BATTERY EMPTY Monitor top right Error message 10 EN Using the microSD card/ microSDHC card (sold separately) A microSD card or microSDHC card (hereafter both will be referred to as microSD card) is also compatible with this camera using the microSD Attachment. “Using the microSD Attachment” (p. 48) Index area Notch Insert the card straight until it clicks into place. Do not touch the contact area directly. 1 2 This camera allows the user to take pictures using the internal memory even when no xD-Picture Card (sold separately) is inserted. “Using an xD-Picture Card” (p. 46) “Number of storable pictures (still pictures)/ Continuous recording length (movies) in the internal memory and xD-Picture Card” (p. 47) To remove the xD-Picture Card 2 1 Insert the microSD card into the microSD Attachment. Insert the card entirely into the attachment. 2 Insert the microSD Attachment into the camera. Notch To remove the microSD card Pull the microSD card straight out. Do not touch the contact area of the microSD Attachment and/or microSD card. Press the card in until it clicks and comes out slightly, then grab the card and pull it out. EN 11 Arrow pad and operation guide The symbols 1243, displayed on various setting and movie playback screens indicate that the arrow pad be used. Setting the date and time The date and time set here are saved to image file names, date prints, and other data. 1 Press the nbutton to turn on the camera. .The date and time setting screen is displayed when the date and time are not set. 2009.10.26 12:30 100-0004 00:14 /00:34IN / 12 30 OK YM D TIME MENUCANCEL SET 0.0 +0.3 +0.7 +1.0 EXPOSURE COMP. 1 X Y M YM D D TIME ---- MENUCANCEL Date and time setting screen 4 3 2 Use klto select the year for [Y]. 2 Arrow pad Operation guides displayed at the bottom of the screen indicate that the mbutton, Bbutton, zoom buttons, or Dbutton be used. 4 2 5 3 6 IN OKMENUBACK GO TW SET OK DMENUEXIT SET OK CAMERA MENU 3 Press nto save the setting for [Y]. 2009 X Y M YM D D TIME MENUCANCEL 2009 -- X Y M YM D D TIME MENUCANCEL 4 As in Steps 2 and 3, use klmn and the Bbutton to set [M] (month), Operation guide [D] (day), [TIME] (hours and minutes), and [Y/M/D] (date order). For a more accurate setting, press the Bbutton when the time signal hits 00 seconds. To change the date and time, adjust the setting from the menu. [X] (Date/time) (p. 31) 12 EN klmnto select [E] (SETUP). MENUEXIT SET OK SETUP MENUEXIT SET OK SETUP 2 Press the Bbutton. 1 2 3 BACKUP NO SETUP ENGLISH PIXEL MAPPING MEMORY FORMAT MENUEXIT SET OK Shooting, Playbac k, and Er asing Shooting with the optimum 2 Hold the camera and compose the aperture value and shutter shot. speed (Pmode) In this mode, automatic shooting settings are activated while also allowing changes t...