


Assessments - 2, GPA: 4.5
(

 )
)
|
Fotos e especificações Philips AJ 3470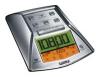 |


Facilidade de uso
# TIME ZONE/ SUMMER TIME - toggles and adjusts clock time display for summer time or time zone settings (for AJ3475 models only) $ VOLUME - adjusts the volume INSTALLATION AC Power Supply 1. Check if the mains voltage, shown the type plate on the bottom of the set, corresponds to your power supply. If it does not, consult your dealer or service centre. 2. Connect the adaptor to the wall socket. ] ]] ...PH...IL..IPS scrolls across the display continuously. • Press TIME SET or SLEEP/ RADIO ON to exit the demo mode, before you set the times or switch on the radio. 3. To disconnect the set completely from the power supply, withdraw the adaptor from the wall socket. Standby power consumption ..........3W The type plate is located on the bottom of the set. MEMORY BACKUP The memory backup conveniently allows your clock, alarm and radio presets settings to be stored for up to 3 minutes when there is a power interruption e.g. AC power failure. The complete clock radio and display will be switched off. As soon as the power supply returns, the display will indicate the correct time. • If power supply returns after 3 minutes, or the time display flashes, you will need to re-enter the your original settings. CONNECTING HEADPHONES Connect headphones with a 3.5 mm plug into the p socket. = The built-in speaker will now be muted on the set. DISPLAY BRIGHTNESS • Toggle REPEAT ALARM/ BRIGHTNESS CONTROL. = There are 3 settings: bright . medium . dim English CONTROLS/ SETTING SETTING RADIO CONTROLLED FOR AJ3475 MODELS ONLY) Your clock is equipped with a receiver which controls and allows automatically and accurately. After you exit the demo mode, if the radio controlled clock signal will appear within 10 seconds and the time be automatically set within 3 minutes. • The signal may disappear / blink during normal operation as a result of electrostatic interference (see Troubleshooting.) • If does not appear or blinks for more than 3 seconds, this means that the radio controlled clock transmission is too weak to be received, and you will need to set the clock manually to run on normal quartz time. • When the radio time transmission for your time zone is duly received, this information will replace any manually set time. To improve radio controlled clock reception: 1. Place the set at a window away from metal objects such as aluminum sunblinds and panelling. 2. Make sure that the antenna is placed securely and horizontally on a flat surface. Adjust the position of the antenna gradually: wait for to blink each time you rotate the antenna. It may take 2-3 minutes to adjust the antenna for automatic setting of the clock. TIME ZONE AND SUMMER TIME SETTING (FOR AJ3475 MODELS ONLY) This feature allows you to set the clock display with up to 2 hours difference from the radio controlled clock time. 1. In the standby mode, press the TIME ZONE/ SUMMER TIME button once. = If the display shows the time zone setting 00:00, this indicates that there is no time difference selected. 2. Press 3 / 4 briefly to select up to +2:00 or -2:00 hours difference respectively. 3. Press the TIME ZONE/ SUMMER TIME button again if you want to exit the time zone display immediately. AUTO SUMMER/ STANDARD TIME SELECTION ( FOR AJ3475 MODELS You can set the clock to Auto to automatically adjust to summer time using the radio signal, or where there is a seasonal 1. Make sure TIME ZONE setting is deactivated. 2. In the standby mode, press the TIME ZONE/ SUMMER TIME button twice within 1 second to activate Auto (summer time) or Std (standard time) 3. Press 3 / 4 briefly to select Auto or Std = If you have selected Auto during summer time, . 4. Press TIME ZONE/ SUMMER TIME again to return to the normal clock display. SETTING THE CLOCK AND ALARM TIMES (see figure 3) The time is displayed using the 24-hour clock. 1. In the standby mode, press TIME SET/ AL SET / AL SET to activate the setting mode. = The clock or alarm time display flashes. 2. Press HOUR/ MINUTE to adjust the hours and minutes respectively. = With your finger held down on HOUR/ MINUTE, the display will increase the hours / minutes rapidly and continuously. = Press HOUR/ MINUTE briefly and repeatedly to adjust the time slowly. 3. Press the respective TIME SET/ AL SET / AL SET control again when you have reached the correct time. Francais COMMANDES/ COMMANDES (voir fig. 1) 1 Commandes de l'ecran Affiche les reglages de l'horloge Les commandes de la programmation lorsque la reception radio est HOUR - reglages de l'heure AL - selection et activation/ desactivation ( ON/ OFF) de l'option d'alarme par radio AL SET - reglage de l'heure d'alarme radio TIME SET - reglage de l'heure AL - selection et activation/ desactivation ( ON/ OFF) de l'option d'alarme par sonnerie AL SET - reglage de l'heure d'alarme par sonnerie MINUTE - reglage des minutes PRESET 1-5 -selection/ memorisation d'une station radio 2 Affichage de l'heure de l'alarme 3 Affichage de l'horloge 4 REPEAT ALARM/ BRIGHTNESS CONTROL -coupure de l'alar...
Este manual também é adequado para os modelos :Receptores de rádio - AJ 3475 (962.07 kb)
Relógios - AJ3470/00 (962.03 kb)
Relógios - AJ3475/00 (962.03 kb)