


Assessments - 3, GPA: 4.3
(

 )
)
|
Fotos e especificações Star Trac S-TBT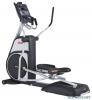 |


Facilidade de uso
Note: (2) of the screws are in the PVS kit, (2) retained from earlier step. Do not tighten them at this time. STAR TRAC UNIVERSAL TV BRACKET INSTALLATION STEP7 Adjust the cap with the grommet into place. Using the 5mm Hex Key, tighten the M8 Button head screws to about 190 lb-in (21.5 N-m) of torque. Take the (2) Phillips head screws you removed from the original cap and snugly tighten screws down using a #2 Phillips screwdriver. STEP8 Connect the ground wire back to the display mount and connect the 12 pin serial cable back to the 12 pin socket on the display. And then, place the display front plastic onto the back. Make sure the bottom of the display front is under the 2 tabs on the display mount. Press the front display against the round tube and rotate it to the back. Be careful not to pinch any wires. STEP9 Using a #2 Phillips screwdriver, secure the front display to the back with the (8) screws you previously removed and saved. STAR TRAC UNIVERSAL TV BRACKET INSTALLATION To install the TV neck on the E-TR, follows these steps: STEP1 Using a #2 Phillips screwdriver, to remove the (8) screws from the upper back of the display. Place the cover some where safe to keep it from being damaged. Next, to remove the (6) screws from the lower back of the display. Place the cover with the other one. Retain all the screws for later use. STEP2 Now remove the upper cap cover that has the STAR TRAC logo on it. This cap is held in by the upper back cover. You will no longer need this cap cover and, if desired, you can store it away for any possible future use. STEP3 Take the Personal Viewing Screen from the PVS kit. Next, take the (2) M8 Button head screws, theM8 Hex nut with washer, and the 5mm Hex key from the PVS hardware tool kit. STAR TRAC UNIVERSAL TV BRACKET INSTALLATION STEP4 Mount the Personal Viewing Screen on the Treadmill. Using the 5mm Hex Allen Key, screw in the (2) M8 Button heads at the base of the PVS. STEP5 Adjust the display cap up or down to align with the holes on the display front. Once the cap is aligned, tighten the button head screws with the 5mm Hex Allen Key. STEP6 Replace the top back plastic. Use a #2 Phillips screwdriver insert the (8) screws, retained from earlier step, into the plastic. Do Not tighten at this time. Check the cap with the neck and grommet. Make sure the cap is flush with the top back plastic. Adjust if necessary. Use the screwdriver to tighten the screws snug from the previous step. Caution: Do Not over tighten screws. STAR TRAC UNIVERSAL TV BRACKET INSTALLATION To install the TV neck on the S-UB, S-RB, and S-TBT, follows these steps: STEP1 Remove the TV hole cover: On the back side of the neck tubing, using a flat screwdriver, unclench the TV hole cover from the notch. (The cover is not used anymore, but you may save it for future use as you like.) STEP2 Install TV bracket: Using a 5mm Hex Allen Key, install the TV bracket to the neck tubing with a 8mm button head screw. STAR TRAC UNIVERSAL TV BRACKET INSTALL...
Este manual também é adequado para os modelos :Formadores - E-RB (314.88 kb)
Formadores - S-RB (314.88 kb)
Formadores - S-UB (314.88 kb)